Normally for getting the dual boot option in Windows, we will first install the lower
version of Windows then higher version. But if we are trying to dual boot MS DOS 6.22
and MS Windows Vista business, DOS will not boot. This is due to during the
installation of Windows Vista, it will corrupt the boot sector entries of DOS, hence only
Windows Vista will boot.
We will able to dual boot MS DOS 6.22 and Windows Vista business. Refer the
below said procedure for more details

Requirements:
Operating Systems:
1) MS DOS 6.22 floppies
2) Windows Vista Business 32 bit CDs
btsect25.zip (ver 2.51):
Thiis zipped file contains 3 files named BTSECT.BAT, bootread.scr, BTSECT.TXT. BTSECT.BAT creates a new C:\bootsect.dos from the current C: sector.
It runs in from your DOS boot disk, or Startup Disk.
You can also down load the same from the below said link
http://www.thpc.info/dual/bootsectdos.html
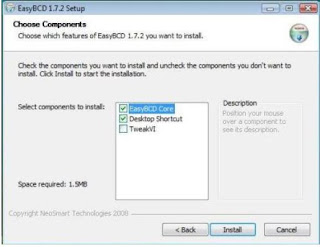
EasyBCD (ver 1.7.2):
Here by I have attached one copy of EasyBCD.exe file in mail body. EasyBCD is an
advanced GUI application that makes it easy to modify the Windows Vista boot loader
and the entries in it.
You can also down load the same from the below said link
http://neosmart.net/dl.php?id=1

Creating bootable MS DOS Startup disk with btsect files.:
After installing the MS DOS 6.22 in the machine, copy the contents of btsect25.zip
file into MS DOS 6.22 DISK1 for creating startup disk. And also copy the file
CHOICE.COM to disk 1 from C:\DOS by using the below said command.
C:\DOS\>copy choice.com a:
(Ensure to keep the MS DOS 6.22 disk 1 in FDD)

Phase -1 MS DOS 6.22 Installation:
1) Install MS DOS 6.22 in 2 GB partition


Phase -2 Installing BTSECT.BAT:

  1. Boot the machine by using the MS DOS Startup disk you have created. MS DOS
    setup will begin. Press F3 twice after it loads up to exit setup. Now you will get
    A:\
  2. Run BTSECT.BAT file from A: drive. This stores a copy of the current
    bootsect.dos on the root directory of the C: drive
    A:\>BTSECT
  3. At the Read the help file (BTSECT.TXT [Y/N])? Type Y or N as per your
    requirement
  4. At the Create a new bootsect.dos now[Y/N]?Type Y
  5. At the Press any key to continue! Press Enter Key
  6. At the Use SYS C: command[Y/N]?Type Y
  7. At the Restore original system boot files[Y/N]? Type Y
  8. At the Read dual boot repair help[Y/N]? Type Y or N as per your requirement
  9. At the Exiting. Finished Reading[Y/N]? Type Y

Phase -3 Installing Windows Vista Business 32 bit

  1. Install Windows Vista business to a new NTFS partition. (Make sure you do not
    alter the FAT16 DOS partition.)
  2. After the installation, you will able to boot in to Windows Vista. Note, now you
    will not get dual boot option and will not able to boot in to DOS. But inside the
    Windows Vista, you will be able to see the D: drive partition, which is our DOS
    partition.

Phase -4 Installing EasyBCD in Windows and adding MS DOS boot entry.

  1. Enter into Windows vista.
  2. Install Easy BCD. At the Welcome screen click Next.
  3. At the License Agreement screen, click on I Agree

  4. At the Choose components screen, Click on Install
  5. At the Completing the Easy BCD setup Wizard screen, Click on Finish.

  6. EasyBCD will run automatically (Or you can run it from the shortcut created on
    desktop). Click on Add/Remove Entries to add the boot entry for DOS
  7. You will get the below said screen.

  8. Under Add an Entry tab, Change the below said
    Type as Windows 95/98/ME
    Name as MS DOS 6.22
    Drive as D:\
    And then click on Add Entry. You will get the bellow screen. Click on
    save to save the entries.
Restart the machine. Now your machine is capable to dual boot. Use arrow keys
to highlight your choice.
Kindily Request You To For Valuable Comments

Linux allows binding multiple network interfaces into a single channel/NIC using special
kernel module called bonding. Linux allows binding multiple network interfaces into a
single channel/NIC using special kernel module called bonding.
Operating System :

Red Hat Enterprise Linux AS Release 4
Kernel 2.6.9-42.Elsmp

Step #1(NIC): Create a bond0 configuration file
Red Hat Linux stores network configuration in /etc/sysconfig/network-scripts/ directory.
First, you need to create bond0 config file:
# vi /etc/sysconfig/network-scripts/ifcfg-bond0
Append following lines to it:
DEVICE=bond0
IPADDR=192.168.1.20
NETWORK=192.168.1.0
NETMASK=255.255.255.0
USERCTL=no
BOOTPROTO=none
ONBOOT=yes

Replace above IP address with your actual IP address. Save file and exit to shell prompt.

Step #2(NIC): Modify eth0 and eth1 config files:
Open both configuration using vi text editor and make sure file read as follows for eth0
interface

# vi /etc/sysconfig/network-scripts/ifcfg-eth0
Modify/append directive as follows:
DEVICE=eth0
USERCTL=no
ONBOOT=yes
MASTER=bond0
SLAVE=yes
BOOTPROTO=none
Open eth1 configuration file using vi text editor:

# vi /etc/sysconfig/network-scripts/ifcfg-eth1

Make sure file read as follows for eth1 interface:
DEVICE=eth1
USERCTL=no
ONBOOT=yes
MASTER=bond0
SLAVE=yes
BOOTPROTO=none
Save file and exit to shell prompt.

Step # 3: Load bond driver/module:
Make sure bonding module is loaded when the channel-bonding interface (bond0) is
brought up. You need to modify kernel modules configuration file:

# vi /etc/modprobe.conf

Append following two lines:
alias bond0 bonding
options bond0 mode=balance-alb miimon=100
Save file and exit to shell prompt. You can learn more about all bounding options in
kernel source documentation file

Step # 4: Test configuration:
First, load the bonding module:
# modprobe bonding
Restart networking service in order to bring up bond0 interface:
# service network restart
Verify everything is working:
# less /proc/net/bonding/bond0

Output:
Bonding Mode: load balancing (round-robin)
MII Status: up
MII Polling Interval (ms): 0
Up Delay (ms): 0
Down Delay (ms): 0
Slave Interface: eth0
MII Status: up
Link Failure Count: 0
Permanent HW addr: 00:0c:29:c6:be:59
Slave Interface: eth1
MII Status: up
Link Failure Count: 0
Permanent HW addr: 00:0c:29:c6:be:63
List all interfaces:
# ifconfig


Output:
bond0 Link encap:Ethernet HWaddr 00:0C:29:C6:BE:59
inet addr:192.168.1.20 Bcast:192.168.1.255 Mask:255.255.255.0
inet6 addr: fe80::200:ff:fe00:0/64 Scope:Link
UP BROADCAST RUNNING MASTER MULTICAST MTU:1500 Metric:1
RX packets:2804 errors:0 dropped:0 overruns:0 frame:0
TX packets:1879 errors:0 dropped:0 overruns:0 carrier:0
collisions:0 txqueuelen:0
RX bytes:250825 (244.9 KiB) TX bytes:244683 (238.9 KiB)
eth0 Link encap:Ethernet HWaddr 00:0C:29:C6:BE:59
inet addr:192.168.1.20 Bcast:192.168.1.255 Mask:255.255.255.0
inet6 addr: fe80::20c:29ff:fec6:be59/64 Scope:Link
UP BROADCAST RUNNING SLAVE MULTICAST MTU:1500 Metric:1
RX packets:2809 errors:0 dropped:0 overruns:0 frame:0
TX packets:1390 errors:0 dropped:0 overruns:0 carrier:0
collisions:0 txqueuelen:1000
RX bytes:251161 (245.2 KiB) TX bytes:180289 (176.0 KiB)
Interrupt:11 Base address:0x1400
eth1 Link encap:Ethernet HWaddr 00:0C:29:C6:BE:59
inet addr:192.168.1.20 Bcast:192.168.1.255 Mask:255.255.255.0
inet6 addr: fe80::20c:29ff:fec6:be59/64 Scope:Link
UP BROADCAST RUNNING SLAVE MULTICAST MTU:1500 Metric:1
RX packets:4 errors:0 dropped:0 overruns:0 frame:0
TX packets:502 errors:0 dropped:0 overruns:0 carrier:0
collisions:0 txqueuelen:1000
RX bytes:258 (258.0 b) TX bytes:66516 (64.9 KiB)
Interrupt:10 Base address:0x1480

Now you have bond multiple network interfaces into a single channel (NIC)